Horizontal Sausage Stuffer Nozzles: Clean, Even Links
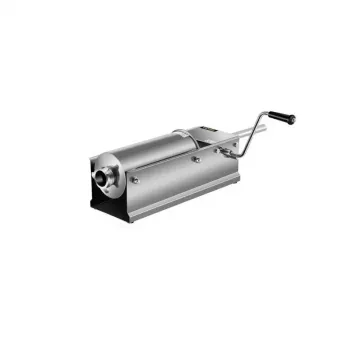
Horizontal Sausage Stuffer with Nozzles: Clean Fills, Consistent Links, Less Mess
A horizontal sausage stuffer with multiple nozzles is built for steady pressure, controlled speed, and repeatable results—whether making breakfast links, bratwurst, snack sticks, or fresh sausage for the freezer. The right setup helps reduce air pockets, prevents casing blowouts, and keeps hands free for guiding casings instead of fighting the fill.
What Makes a Horizontal Stuffer Different
The biggest advantage of a horizontal design is how stable and predictable it feels during a batch. The side-loading layout keeps the cylinder planted on the counter and makes it easier to monitor how much mixture is left while cranking. That “clear view” matters when you’re trying to keep pressure steady instead of rushing through the last few turns.
Compared with makeshift funnel-and-spoon methods, a hand-crank stuffer provides consistent pressure that helps create an even texture and uniform links. That control is especially noticeable at the start and end of each casing: you can ease into the fill, pause on command, and stop cleanly—reducing burst spots and uneven packing.
Storage can also be simpler. Depending on capacity, a horizontal frame may fit into lower cabinets more comfortably than a tall vertical model, which can be a practical detail for home kitchens.
Why Multiple Nozzles Matter
Nozzle diameter affects fill speed and how much friction the casing experiences as it slides. When the tube is too large, casings overstretch and tear more easily; when it’s too small, friction increases and the casing can snag or drag—both scenarios can introduce air pockets and weak spots.
Multiple tubes make it easier to match the nozzle to your casing: narrower tubes for small casings (breakfast links, snack sticks) and wider tubes for larger hog or collagen casings. Using the closest-fitting option helps the casing glide with less strain, supports a tighter fill, and reduces the “ballooning” effect that makes twisting links frustrating.
Just as important, having several tube sizes on hand means switching sausage styles doesn’t require improvised adapters or awkward workarounds. That keeps the process cleaner and more repeatable batch to batch.
Horizontal Sausage Stuffer with 5 Nozzles: Quick Overview
For home sausage-making where consistency and cleanliness matter more than high-volume throughput, a horizontal unit with multiple nozzles offers a practical sweet spot. A manual crank allows slow starts, quick pauses, and fine control to avoid overfilling—especially helpful when stuffing delicate natural casings.
If your ground meat mix has been properly chilled and mixed for bind, stuffing becomes smoother and the finished links hold together better during cooking and freezing.
At-a-Glance Details
| Item | Details |
|---|---|
| Product | Horizontal Sausage Stuffer with 5 Nozzles |
| Nozzles included | 5 tubes (varied sizes) |
| Use cases | Fresh sausage, links, larger casings, smaller casings (tube selection dependent) |
| Price | $167.01 (USD) |
| Availability | In stock |
Setting Up for Smooth Stuffing
A clean, steady fill starts before the stuffer ever touches the counter. First, keep the meat mixture cold. Chilled meat stuffs cleaner, holds texture better, and reduces fat smearing that can lead to a greasy look and poor bite. Work in small batches and return the bowl to the fridge between runs when possible.
Prep casings the right way for the type you’re using. Natural casings typically need soaking and flushing; once they’re ready, slide them onto the nozzle with a little slack so the first crank doesn’t yank and tear the casing. If the casing drags, lightly oil the exterior of the nozzle with a minimal amount of food-safe oil—just enough to help it glide.
Before committing to the casing, purge air from the system. Crank until the sausage mixture reaches the nozzle tip, then start filling. Aim for even pressure and avoid sudden, hard cranks that can create weak spots and blowouts.
Getting Consistent Links and Fewer Air Pockets
Stuff firmly, but don’t overstretch. A casing should feel full while staying pliable enough to twist. If you pack too aggressively, the casing becomes tight and fragile, and links are more likely to split during twisting or cooking.
After stuffing, a short rest in the refrigerator helps the mixture set and can reduce splitting when heat hits the casing. For longer storage, follow reliable freezing guidance and labeling practices from the National Center for Home Food Preservation.
Cleaning and Food-Safety Basics
After washing, sanitize food-contact surfaces following sanitizer label directions, then allow parts to dry thoroughly before reassembly or storage. During prep, keep raw meat below 40°F (4°C) and minimize time at room temperature. For practical, authoritative handling guidance, review USDA FSIS food-safety resources and the FDA’s core consumer steps—clean, separate, cook, chill—at FDA Food Safety for Consumers.
Troubleshooting Common Problems
Who This Setup Fits Best
If you’re new to the process and want a simple way to build confidence through trial and refinement, a quick-read resource like How to Learn and Grow from Mistakes – Digital Guide can be a handy companion for staying consistent and improving batch by batch.
FAQ
Which nozzle size should be used for different casings?
Choose the nozzle that most closely matches the casing diameter so the casing slides on without excessive stretching. Narrow casings generally need smaller tubes, while larger hog or collagen casings work better on wider tubes, helping reduce tearing and trapped air.
How can air pockets be minimized while stuffing?
Keep the mixture cold, pack the cylinder firmly to avoid trapped air, and purge until meat reaches the nozzle tip before loading a casing. Crank steadily, and if small bubbles appear, prick them gently with a sanitized pin and continue.
How should the stuffer and nozzles be cleaned after raw meat use?
Disassemble promptly, wash with hot soapy water, and brush inside each tube to remove residue. Rinse, dry thoroughly, and sanitize food-contact surfaces according to sanitizer directions while keeping raw meat time and temperature controlled during prep.









Leave a comment